 Save
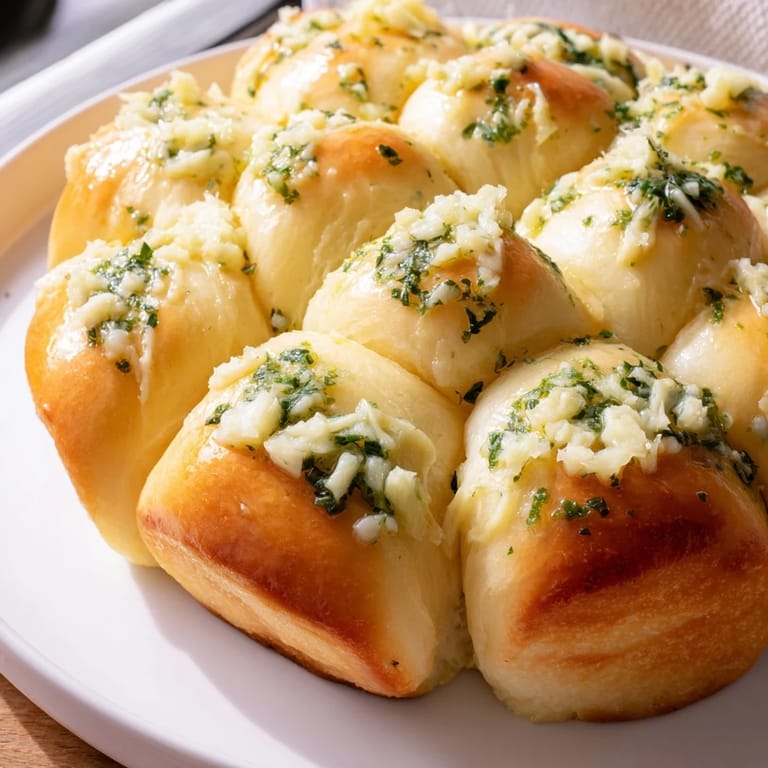
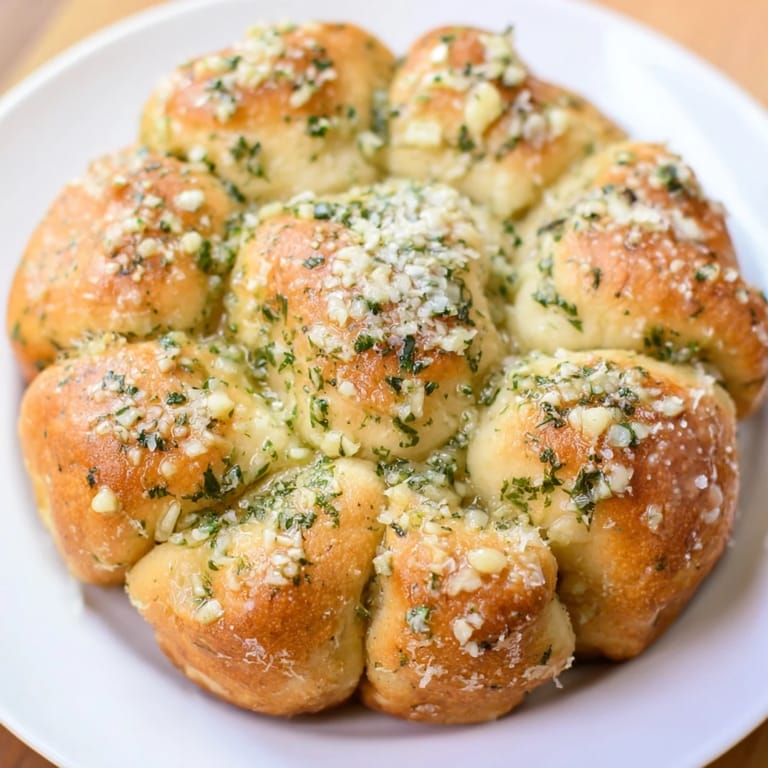
Save There's something magical about the moment when a pan of garlic butter rolls comes out of the oven and hits the cooling rack with that exact, unmistakable sizzle. My neighbor once asked what smelled so good wafting over the fence, and when I told her it was just bread, she didn't believe me until I handed her a warm roll straight from the pan. That's when I knew this recipe was special—it doesn't try to be fancy, but somehow it feels like a celebration every single time you make it.
I made these for a potluck once and watched a usually quiet coworker reach for a third roll without saying anything—just a knowing smile and another reach. Something about the way they tear apart and the golden, garlicky exterior makes people lose their usual restraint. That's when I started bringing them everywhere, because food that brings out that kind of quiet joy is worth the twenty minutes of hands-on work.
Ingredients
- All-purpose flour (3 cups): The foundation that'll give you tender rolls with just enough structure to hold the garlic butter without getting tough.
- Instant yeast (2¼ tsp): This is your rising agent, and the warmth of the milk activates it—don't skip the temperature check or you'll be waiting forever.
- Warm milk (1 cup): This keeps the dough soft and luxurious, almost pillowy as it bakes.
- Unsalted butter (8 tbsp total): Split between the dough and the garlic coating—it's what makes these rolls memorable instead of just filling.
- Garlic (4 cloves, minced): Don't use powder here; fresh garlic releases those aromatics that make people's heads turn toward the kitchen.
- Fresh parsley (2 tbsp): A small touch that keeps the rolls from feeling one-dimensional and adds brightness to each bite.
- Parmesan cheese (optional but recommended): A light shower before baking creates spots of extra savoriness and a bit of visual appeal.
Tired of Takeout? 🥡
Get 10 meals you can make faster than delivery arrives. Seriously.
One email. No spam. Unsubscribe anytime.
Instructions
- Mix Your Base:
- In a large bowl, combine the flour, yeast, sugar, and salt together, then pour in the warm milk and melted butter. Stir until everything comes together into a shaggy mass that looks a bit rough but holds together.
- Knead Into Smoothness:
- Turn the dough onto a floured counter and knead for about 7 to 8 minutes—your arms will feel the transformation as it goes from sticky to supple and elastic. You want it smooth enough that it springs back when you poke it.
- Let It Rise First Time:
- Pop the dough into a greased bowl, cover it with a cloth or plastic wrap, and tuck it somewhere warm for about an hour until it's roughly doubled. A sunny windowsill works great, or the top of your fridge if your kitchen runs cool.
- Build Your Garlic Butter:
- While waiting, mix your melted butter with the minced garlic, parsley, salt, and pepper in a small bowl. The garlic will perfume the butter as it sits, so don't rush this step.
- Shape the Rolls:
- Once risen, punch down the dough to release the air, then divide it into 12 roughly equal pieces. Roll each one between your palms until it's a smooth ball—takes maybe 15 seconds per roll.
- Coat and Arrange:
- Dip each ball into the garlic butter, letting it soak in all the flavor, then nestle them together in a greased 9-inch round pan. Drizzle any remaining butter over the top to make sure every layer gets its share.
- Second Rise:
- Cover loosely and let them puff for 20 to 30 minutes—they shouldn't double this time, just look a bit softer and more filled out. This is when your kitchen will start smelling incredible.
- Bake to Golden:
- Heat your oven to 350°F, sprinkle with Parmesan if you're using it, then bake for 22 to 25 minutes until the tops are deep golden brown and the edges are set. A few spots of darker brown are actually a good sign—that's where the flavors concentrate.
- Cool and Serve:
- Let them sit in the pan for 5 minutes so they firm up just enough to handle, then serve them warm while the butter is still giving off that garlic perfume.
 Save
Save Years ago, my dad told me that good food brings people together not because it's complicated, but because it's generous. These rolls feel generous—you're not rationing them or counting bites, you're just passing the pan around. That shift in how people relate to eating is something I notice every time I make them.
Why This Recipe Wins Every Time
There's a reason this bread works for every occasion from weeknight family dinners to impressive entertaining. The dough is forgiving if your timing isn't perfect, the flavors are crowd-pleasing without being boring, and there's something satisfying about the pull-apart format that feels modern and shared all at once. You're not plating individual rolls—you're setting down something meant to be torn into and enjoyed together, and that changes the whole energy of a meal.
Flavor Variations That Actually Work
Once you nail the basic recipe, small swaps open up endless possibilities. A pinch of chili flakes adds heat without drowning out the garlic, while a touch of smoked paprika brings a campfire quality that pairs beautifully with soups. Even something as simple as swapping half the parsley for fresh basil creates a completely different vibe, making the rolls feel lighter and more summery.
Storage and Next-Day Magic
These rolls stay soft for a couple of days if you wrap them in foil, and honestly, they're wonderful served at room temperature or even gently warmed in the oven the next day. I've found that leftover rolls make incredible snacks, and some people even slice them horizontally and toast them to use as bread for sandwiches, though that feels almost sacrilegious when they're this good fresh.
- Wrap cooled rolls tightly in foil to keep them soft and prevent them from drying out.
- If you want to freeze extras, place cooled rolls in a freezer bag and reheat gently when you need them.
- Always serve these warm or at worst at room temperature—cold dough loses its charm.
 Save
Save This recipe is the kind that becomes part of your regular rotation without you planning it that way. Before long, people will ask for it specifically, and you'll find yourself making it on random Tuesdays just because.
Common Questions
- → What type of flour works best for this bread?
All-purpose flour provides a balanced texture and rise, creating soft yet sturdy rolls perfect for pull-apart bread.
- → Can I prepare the dough in advance?
Yes, the dough can be prepared the night before and refrigerated to rise slowly for richer flavor, then shaped and baked the next day.
- → How do I ensure the garlic butter evenly coats the rolls?
Use a pastry brush or dip each dough ball directly into the garlic butter mixture, making sure all surfaces are covered for maximum flavor.
- → What variations can enhance the flavor?
Adding chili flakes for spice, incorporating mozzarella cubes, or sprinkling Parmesan cheese before baking can provide delicious twists.
- → What is the best way to serve this bread?
Serve warm, pull-apart style alongside hearty soups, pasta, or salads to complement savory meals.